Thursday, 11 October 2012

Our Horror Title Sequence - Audience Research

Interviews

This is a video of some interviews that our group filmed, it is mainly based around horror films and the horror genre. We asked mostly the same questions as on the horror questionnaire that can be seen below the video on this post. Our group made this in order to show the range of ages and different types of people to which we have asked questions about horror films and the horror genre which is what our final production will be based on. The Interviewees ranged from child to adult, and their opinions were also quite different for some questions.


Handouts

The First Draft of our handout surveys was basic and contained some errors, for example repetition of the same question and some spelling mistakes. It can be seen in the image below. It is a widely open answer one as opposed to a yes / no survey. We will be able to collect data that is more useful as we can see into that person's situation and what appeals to them about horror films. The use of the graphic blood, red, black and white colour scheme and the vignette add a horror feel to the survey giving the person who is filling it out a more horror references so it is easier to remember things they have seen, thus giving us more reliable data to work with.


Here is what the  final paper surveys that we handed out looked like and after completetion from college students.


Online

Below an example of our internet published version of the survey can be seen.


Our Results (as of 20/11/2012)


 The image below shows the spreadsheet in which our results from our online survey were collated and the results from the paper hand out sheets were inputted. I added conditional formatting to the cells in the columns B and C to make it clearer to read. If the gender of the person is male, the cell turns automatically blue, and likewise with pink for girls. In column B I have set it up to turn green for people who's age is within our targeted audience, yellow for the ages who are borderline and red for the age groups who we aren't specifically aiming at. All of this is changed automatically by a formula when the data is entered.


Age & Gender

The first question we asked was to gather information about the age of people who watch horror films, and with that the second was to find out what gender our audience are. The image below shows the most frequent ages that came up and also shows a pie chart of the gender of people who completed our survey. The numbers for gender are roughly even, as we tried to get an even balance of results.


Genre

After finding out the age and gender of our survey applicants we then questioned which sub genre of horror they prefer, these results can be seen below. We collected them into a bar chart as this is the easiest way to compare and see which is the most popular.
It was clear to see that Psychological Horror was by far the most popular so we decided to base our narrative around this.


Frequency of Watching Horror

For this question, selecting a time period was difficult as some people may watch a horror film very very rarely and so of course this wouldn't cover for them, however we decided to use a weekly base as we made sure that the people who we asked to fill out our questionnaires actually did watch horror films.
From our data we gathered it is clear that the vast majority of people who watch horror films watch about one per week. So from this we realised that to make sure people would watch our horror film we needed to make the first two minutes of our film enticing as the first few minutes of a film often determine how action pact it will be later on.


Actors

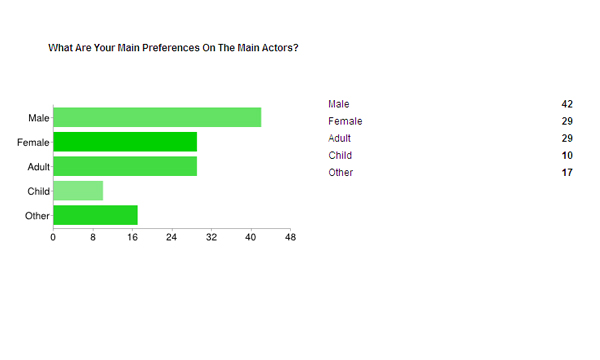
We then went on to ask about the audiences preferences on actors, in which we gave a multiple tick box selection option (so one participant could enter more than one character preference) and it shows that male characters, who are adults are the most preferred. This was the inspiration for the choice our main actor (Josh).

Favourite Horror Films

We then decided that asking what peoples favourite horror films were, to give us an idea of what sort of storyline is most preferred, and the SAW series off films were the most popular. We included similar torturous features as seen SAW films (for example the cut throat razor shots in our introduction and the strapping down of a man).


Setting

When we questioned what peoples favourite horror setting was, we mostly got the response that houses and abandoned places were the most popular. So we decided that we should combine them to make an abandoned house part of our setting (in the shot where the man is being strapped down). We have also used our data here to decide where our flashbacks are going to come from (where the character will be when he is having them) and that will be an unused tunnel that looks misused and old with grungy walls.


Credits

Although the majority of people by 5 prefer the credits separate to the footage at the beginning (so for example at the end of the film) we had to consider that a lot of films have their credits separate to the shot footage and we decided that in order to make our horror film different from the majority we would integrate our credits into the flashback.


Sound

From collecting this information about sound, we have decided as a group to use a quiet and creepy music track (in which we will build and layer ourselves) as this is the favourite choice among our target audience. The use of this quiet soundtrack will create suspense and in use will false climaxes will be very effective in gripping the audience.


Wednesday, 10 October 2012

Our Horror Title Sequence - Locations


Originally we planned on trying to get permission to film on an abandoned hospital site, this however was too big a task as getting the permission was out of the question. A video of this hospitals interior has been embedded below.


To overcome our permissions dilemma, we had decided that our place of interest would have to be somewhere public, but as we wanted to keep the abandoned feel to the set, we had set our eyes on a new unpopulated estate in Stotfold, which gives a similar empty effect. Some research of our chosen estate can be seen in the video below.


After researching our location we then decided that we should go and visit it and find some locations to shoot, so we did and the video below shows some images we took throughout the day which we took to give us an idea of the surroundings.


Tuesday, 9 October 2012

Is It Done? Preliminary Task


The Final Project


Evaluation

Making Of The Unprecedented Pictures Title


This shows the making of the institution title for our own institution Unprecedented Pictures which can be seen in the video below.


This is the 1st step in making the intro involved designing the cube ring by duplicating one cube multiple times with equal spacing on different levels producing the layered cube ring effect. After this the cube ring was taken into a 3D composition program and materials were added to it to give it the colour and texture it has in the image below. After satisfactory colouring of the ring was achieved the next process takes us to the next image.


The next stage involved animating the ring of cubes in 3D space so the rotation and positioning can make it seem that the moving object is coming towards the viewer interactively. Below the image shows a screenshot of the key framing part of the production which makes all of the movement happen. Rotation on the y axis is horizontal spin, rotation on the x axis is vertical spin and z rotation is almost a 'flipping spin action'.

When it comes to positioning z positioning is how close the object is to the viewer, x is on horizontal and y vertical movement. In combination this use of changing these values makes the ring of cubes rotate and settle into the position that we can see in the image below.


This is the 3rd step and this was the colour keying part of the composition. This changed the shiny yellow metal to the purple/copper colour that can be seen below. This colour correction darkens the composition and boosts furthermore the horror atmosphere when watching. The contrast is so deep that black within the ring of cubes is noticeable and portrays the effect of darkness being within (the ring of cubes). A blur and darkening vignette blurs out and darkens the edge of each frame putting emphasis in whats happening within the center of the frame; this effect also adds a feel to field of depth which improves viewing experience.


The fourth stage to the making of the institution title was including the transition from the rusty logo to the pure white logo (so the viewer gets a clear view of the production companies name). This had to be uniquely strapped around the horror theme as a love heart gradient wipe transition would be too inappropriate. So the  static twitch which links the rusty logo to the crisp white logo affects both layers on the timeline so a smoother transition can be achieved.  


The last step in making the title was including horror related sound which is unsettling to hear. As children are seen commonly as unstable and prone to attack we decided to use an ambient of a school playground with has an echoing (reverb added to emphasize this), shouting and screaming of children's voices which really is unpleasant to hear. Behind this track with a louder but with a more 'backseat role' is a minor key set of three chords playing in the strings section of an orchestra as strings are more than often associated with horror soundtracks.
The static effect on screen is accompanied with a static sound effect which is also labelled in the image below (as twitch sound effect). This jumpy, mechanical failure noise simulates that of a system failure or some kind of paranormal activities in the footage to come.
Most of the footage and sound is faded out to nothing to round off the title (so the viewer can understand the gap between the actual feature film and the institution title).


First Draft

This was the first draft but wasn't used due to the logo not being included. The final version can be seen at the top of this page.

Thursday, 4 October 2012

Camera Movement


Here are various types of camera movement often used in horror films. The examples used below may not have any relevance to horrors as these are merely examples of types of camera movement used.


Tracking Shot


Tilt Shot


Zoom Shot


Arc Shot


Crane Shot


Panning Shot